Although there is no specific reason why you should remove recycle bin from desktop..but what if you want to do...well then solution would be something like
Go to START > RUN
Type GPEDIT.MSC
Navagate to USER CONFIGURATION >ADMINISTRATIVE TEMPLATES >Click on DESKTOP,On the right hand pane find " Remove Recycle Bin icon on the desktop " , double left click on it to ENABLE it.
Sorted!
Thursday, October 30, 2008
Sunday, October 19, 2008
Customize Your ‘Send To’ Right-Click Windows Menu
If you’re like me, you frequently need to move the same types of files to the same places over and over again. While you could keep a shortcut pointing to that location on your Desktop, there’s an even easier (and more flexible) way to quickly move files to a favorite place. The secret lies in the “Send To” command found in your right-click contextual menu.
At this point you’re probably either thinking, “what command where?” or “that has a function?” Hopefully we’ll answer both of those in that order for you. First, right-click on any file or folder. Notice that the “contextual” menu, that is, the menu that drops down from your cursor, has several options on it. The one we’re interested in is “Send To.” Once you run your mouse over the ‘Send To’ command, it drops down with a list of locations.

Now when you first saw this tool, if you even noticed it at all, you probably thought it was pretty terrible. Most of the locations on the list, by default, are fairly useless. The only way I ever used ‘Send To’ in the past was to create shortcuts and put them on the Desktop. What you see above is my newly cleaned-up and customized ‘Send To’ menu.
One of the unadvertised features of ‘Send To’ is that you can directly change the items that show up in the list. This is done by going to a specific folder and changing its contents. That folder is found in “Documents and Settings/yourusername.” Note: replace “yourusername” with whatever your user account name is on your computer. Here’s what mine looks like.

Notice that the Send To folder is somewhat transparent, indicating it is a hidden folder. If your hidden folders are not visible, go into “Tools->Folder Options->View (Tab)->Show Hidden Folders.” Once you have done this you are ready to go into your Send To folder.
In the folder, you will see all of the items that show up in the drop down. Most of these are actually shortcuts to those places, though a few are drives, commands to zip, or special system shortcuts to places like the Desktop or ‘My Documents’. Because they’re shortcuts, any other shortcuts you place in this folder will also show up in your Send To drop down.
As you can see above, I cleaned out my folder so it only has a few items in it. Now I have the ability to create shortcuts to the Desktop, zip files, and send files to My Documents, My Pictures, and Screenshots. This last folder, ‘Screenshots’, I added by holding the Alt key while dragging Screenshots into the ‘Send To’ folder. This created a shortcut of the selected folder instead of moving it. If you don’t feel comfortable with that hotkey, simply right click the desired item, click “New->Shortcut” and drag your new shortcut into the ‘Send To’ folder.
After tinkering with my ‘Send To’ list, it’s much more useful. Let’s send some pictures that I used for this article into the Screenshots folder:

Voila! This is a really useful little tool for me because I often need to play with several different types of files and find the best place to do that is on the Desktop. When I’m done using those files I either delete them or toss them into their relevant folders for safe keeping. ‘Send To’ now allows me to send all my screenshots in a batch into the Screenshots folder. This is also handy if you have any folders that take specific actions when items are added to them.
Sunday, August 31, 2008
Add A Watermark In PowerPoint 2007
One way you can spice up a presentation is to add a watermark. Watermarks are also a good way of branding presentations. A watermark is simply a very faint image that appears in the background. For example, it may be a company logo or name. You may have seen documents before that have the word confidential behind the text. Yes, this is a watermark!
PowerPoint 2007 makes it simple for you to add a watermark to a presentation.
To add a picture watermark in PowerPoint 2007:
- Within your presentation, click the slide that you want to add a watermark to. To add a watermark to all of the slides in a blank presentation, on the View tab, in the Presentations Views group, click Slide Master.
- On the Insert tab, within the Illustrations group, do one of the following.
- To use a picture as a watermark, click Picture, locate the picture that you want, and then click Insert.
- To use clip art as a watermark, click Clip Art. In the Clip Art task pane, in the Search for box, either type a word or phrase that describes the clip that you want, or type all or part of the file name of the clip, and then click Go.
- To send the watermark to the back of the slide, under Picture Tools, on the Format tab, in the Arrange group, click Send to Back
Tuesday, August 12, 2008
something to reduce your eye strain
While computer work tends to not be physically risky, that doesn't mean you should assume it's not impacting your health. Carpal tunnel and Computer Vision Syndrome are no laughing matter, and it's important to take steps to avoid them.
EyeDefender helps by starting breaks at intervals of your choosing (you choose the length of the break as well). To rest your eyes you can choose either your default screensaver, an image, or the visual training mode. The training mode is a bit reminiscent of the relaxation portion of Flash Focus for the Nintendo DS.

If you stick to the schedule you set up, EyeDefender breaks will also help prevent repetetive strain injuries. Like anything designed to help your quest for improved health, you've got to stick with it to see benefits.
For web workers that have a hard time tearing themselves away from their screen, EyeDefender is a handy application with tremendous potential benefits. It's free for non-commercial private use and runs on Windows only.
EyeDefender helps by starting breaks at intervals of your choosing (you choose the length of the break as well). To rest your eyes you can choose either your default screensaver, an image, or the visual training mode. The training mode is a bit reminiscent of the relaxation portion of Flash Focus for the Nintendo DS.
If you stick to the schedule you set up, EyeDefender breaks will also help prevent repetetive strain injuries. Like anything designed to help your quest for improved health, you've got to stick with it to see benefits.
For web workers that have a hard time tearing themselves away from their screen, EyeDefender is a handy application with tremendous potential benefits. It's free for non-commercial private use and runs on Windows only.
Sunday, June 15, 2008
blod Gtalk
Gtalk is simple , well that is something that attracts everyone to it and i am no exception..but in a process of making it simple they have just excluded some of the basic features of instant messengers ;invisible mode just in case. but there are some hidden tricks that u can try on Gtalk to make it feature rich for eg. how about writing in bold letters..
type * before and after the text you want in bold and press enter(*look at you*) and you are done..but it should be noted that there should not be any space between * and the first letter of the bold word/sentence as well as the last word/sentence of the bold word/sentence ..
type * before and after the text you want in bold and press enter(*look at you*) and you are done..but it should be noted that there should not be any space between * and the first letter of the bold word/sentence as well as the last word/sentence of the bold word/sentence ..
Wednesday, June 11, 2008
Spamming in Yahoo Messenger ..
This trick works only in windows (so now you know why linux is better,not because of yahoo messanger silly!!!!!!!!!! ) ..anyway try this only on windows systems . Suppose you are chatting with some guy(and if lucky may be with a girl) who is irritating you ..or u want to irritate somebody then this method will really create a great pain in their whatever anatomical part you can think of ;) . So here we go .. open yahoo messenger . then Double Click on the Buddy u want to spam with. Then press “Shift+Ctrl+R” as many times as u want ..the more u do this more he gets spammed . That’s it …the other buddy will get spammed with yahoo msngrr windows …I will give a screen shot here …as soon as possible . This thing works in the latest version of yahoo …and may not work in other msngr’s.....
Wednesday, May 21, 2008
FOR YOUR GIRLFRIENDS
This is for all those lovers who find tough to send love letters to (offcourse) their girlfriend(s)(incase u r jst too lucky)....here is a simple trick :
YOU NEED
1.text file (anyname.txt) containg your message
2.image file (anyname.jpg) any picture (to make it more personal send her favourite actor pic..incase u dont feel insecure)
NOW :
I presume your DOS basics are clear and you didnt do all that romancegiri in your computers class only!!!!!
so put these two files in the same directory and preferably in C drive (for simplicity )
open DOS shell and go to that directory path and write the following command..
copy /b anyname.jpg+anyname.txt somenewname.jpg
hit enter.
you are done ...now open the new file in GUI interface..it will open like a normal image file ..now try opening the same
file in notepad ..in the begining u will come across some letters and symbols , but dont worry go to the end of the file
you will find your message...
IF YOUR ARE CURIOUS TO KNOW WHAT HAPPEND
Well we have just copied two files in binary mode and created a new one.. note here the sequence of jpg+txt is important to create a new file...
Well thats a geeky way to send a message to your girlfriend(in case she is not that into tech thing)...YOU CAN SIMPLY SEND HER A SMS..But i guess love letters have its own importence..any ways all the best for your love life
Sunday, April 20, 2008
find subtitles for movies
Now this is for all those of you who believe movies to be a religion.Whether you're pro-subtitles, anti-subtitles, or subtitle agnostic(i dont know what does that mean!!!!), we can all agree on one thing: subtitles are hard to find over the internet. Often you have to visit a number of sites or forums to find the right subtitles for the movie in question. SubDownloader, a free program written in Python, aims to ease that quest by providing an easy way to download and view subtitles with your movies.

Wednesday, April 2, 2008
Yahoo tracks you!!
As you all know, Yahoo! upgraded its features and the capacities of the mail accounts have grown to 1GB. That's good for sure, but the "monitoring" methods that we all have been far too familiar with in the last couple of years have been renewed with this move also. Yahoo! is now keeping track of which sites its members that are getting into groups or using Yahoo! services are visiting and storing this data with a method called "Web Beacons". The aim is to give these statistics to the partner companies arranged by agreement and to improve the "advertisement guiding" function.
However, those who are bothered by this and do not want to be kept track of have still a choice. Yahoo! has hidden this option way deep inside somewhere
1. Go to the address
http://privacy.yahoo.com/privacy
and click the "Cookies" link under the "Special Topics" column.
2. Click the "Web Beacons" link under the "Reference Links" Column.
3. On this page, click the "click here to opt out" link toward the end of the third paragraph under the "Outside the Yahoo! Network" title.
4. After a while, a page that says you have been out of the monitoring program will load. Without doing anything, close that page or continue your usual surfing by typing another address in the address bar. (Do NOT click the "Cancel Opt-out" button, your action will be cancelled!)
5. You're done! Now Yahoo! will not record what you're doing during surfing.
You can let your friends that might be interested know about this; since no matter how "innocent" it may seem, it's still a violation of privacy
note:
Did you know that Yahoo now tracks every LINK or AD that a user MAY HAVE SEEN ON THE PAGE. They now accumulate 1 Terra byte of data every 1 days
How to Open Password Protected PDF Documents
There are basically two types of PDF protection - the original PDF creator can either restrict opening the PDF file itself or he can restrict others from modifying, printing or copying text and graphics from the PDF file. Here are a few possible workarounds:
When there are Copying or Printing Restrictions..
Say you want to print a couple of pages from the PDF document but the document settings won't let you do that.
Open the document in Acrobat Reader or Foxit and capture the PDF page as an image using any free screen capture software. If there are multiple pages, you may try SnagIt since it can autoscroll and capture multiple pages of the document in one-go.
If you want to copy just a portion of text from some PDF page, use a screen capture tool with OCR features (like Kleptomania, Capture Text discussed here)
Alternatively, you can invest in commercial solutions like Advanced PDF Password Recovery from ElcomSoft and PDF Password Remover from Very PDF.
(These utilities may not recover the password for you - they'll just remove the restrictions from the password protected file)
When there are Document Opening Restrictions..
This is a very tricky case and there's no straight-forward solution to read PDF documents that are password-protected at the Open level.
The software will use methods like Brute Force, Key Search and Dictionary Attack to guess the password. They will try to use all possible character combinations as the password and so the process might take hours or even days and would really depend on your computer's processing power.
Legal Issues: - you maybe surprised to learn that these PDF password cracking software are absolutely legal and Microsoft even awarded ElcomSoft a Gold Certified Partner status.
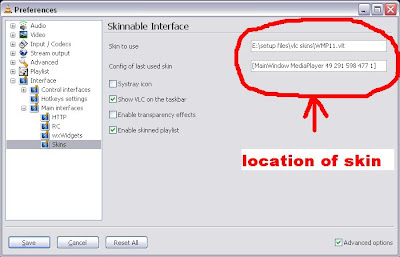
Wednesday, March 12, 2008
changing VLC player skin
Varun is one guy who doesn't like to use VLC player....well for a simple reason he doesn't find it
appealing well that means it doesn't look good and even if he changes its skin,next time when he
launches it he gets the same look and feel of the shell.so i thought let me help him in changing
the skin and make it permanent...well the steps are simple.
 and that is it you have a new VLC player with a beautiful (waxed) skin..
and for all those who do not have a clue on waxed skin i might be the wrong person you are asking this...
appealing well that means it doesn't look good and even if he changes its skin,next time when he
launches it he gets the same look and feel of the shell.so i thought let me help him in changing
the skin and make it permanent...well the steps are simple.
- first download the skin from here
- now go to Preferences and double click Main interface
- and now from the options in INTERFACE MODULE choose the option skinnable interface from the drop down men


- after this from the sub menu of main interface choose skin
- now enter the address of the skin in front of option skin to use
 and that is it you have a new VLC player with a beautiful (waxed) skin..
and for all those who do not have a clue on waxed skin i might be the wrong person you are asking this...
Sunday, March 9, 2008
HIde ur Partitions ( C , D , E , F)
This trick is for all those guys whose wants to store some personal files or data and don't want any one to see or access it dis trick is for all those guys!!
Click start button>run type gpedit.msc, now move to user configuration > administrative templates > windows components > windows explorer, press double click on "Hide these specified drives in My Computer" after following des steps properly u ll find another option "Prevent access to drives from My Computer" double click on dis option & change it accordingly.
To make it normal again click on "disable" by double clicking on "Hide these specified drives in My Computer" option ..
Dats it ur done with it !!!! enjoy dis trick.
Wednesday, March 5, 2008
Pen drive Viruses?
The usage of a pen drive or a flash memory has become a very common thing. Also with the cost of memory chips going down (now you can get a 4GB memory stick for Rs.800) have boosted its usage and also an USB flash drive is compact and very easy to carry around. With the increase in the usage of pen drives, viruses spreading through these memory sticks as increased exponentially.
As such you can't completely prevent the viruses but to minimize these viruses and worms spreading to the PCs we can take some preventive measures.
Turn off the Auto Run:-
Pen drives uses the Autorun feature to load certain files when it is plugged into a USB port. Now, the worms and viruses uses this autorun feature to spread itself from the thumb drives to the computers. You can avoid majority of these worms spreading by turning off the autorun feature. To do is very simple just follow these steps,
If you are using Win XP Professional edition:-

If you are using Win XP Home edition,try these:-
Select Run and type regedit to open the registry editor.
Then navigate as follows
HKEY_CURRENT_USER
--> Software
--> Microsoft
--> Windows
--> CurrentVersion
--> Policies
--> Explorer.
Now,select NODRIVETYPEAUTORUN and select Modify.
Set the Hexadecimal value to 95 to turn off autoplay in removable drives and use b5 to turn off autorun feature in CD-ROMs and pen drives.
Thus turning off autorun feature just stops many malwares from spreading into a PC from a thumb drive.
SOME WELL KNOWN MALWARE:
Now you can now delete many worms manually some known viruses are Autorun.inf,iexplore.vbs,ifo.exe,raven.exe,rvhost.exe and NewFolder.exe(a worm looks like folder,but is actually an exe file,a worm).Better to use a nice antivirus and scan for viruses in the plugged in drive before opening it as these files will be hidden or access protected.But however you can view those files in command prompt by first entering into your removable drive(eg: J:)then type the following- attrib -h -r -s -a *.*.After typing that you can view those files.But it is better to use a nice Anti-virus software.
You can also many softwares available(like TrueCrypt) to password protect your pen drive .In such a case a window Pops Up every time when you plug in the drive.This would also help preventing the viruses from loading automatically into the pen drive. Using such softwares will also prevent unauthorized usage of data your drive, especially when your having sensitive information in your drive.
As such you can't completely prevent the viruses but to minimize these viruses and worms spreading to the PCs we can take some preventive measures.
Turn off the Auto Run:-
Pen drives uses the Autorun feature to load certain files when it is plugged into a USB port. Now, the worms and viruses uses this autorun feature to spread itself from the thumb drives to the computers. You can avoid majority of these worms spreading by turning off the autorun feature. To do is very simple just follow these steps,
If you are using Win XP Professional edition:-
- Click Start button
- Select Run.
- Now type gpedit.msc in Run command .
- You will notice the Group Policy Window opening.
- Double click Administrative Templates.
- Select System in the right pane of the window.
- Now,select(double click)Turn Off AutoPlay .
- Turn Off Autoplay properties window opens.
- Now.select All Drives from the combo box in that and select Enabled radio button and press OK.
If you are using Win XP Home edition,try these:-
Select Run and type regedit to open the registry editor.
Then navigate as follows
HKEY_CURRENT_USER
--> Software
--> Microsoft
--> Windows
--> CurrentVersion
--> Policies
--> Explorer.
Now,select NODRIVETYPEAUTORUN and select Modify.
Set the Hexadecimal value to 95 to turn off autoplay in removable drives and use b5 to turn off autorun feature in CD-ROMs and pen drives.
Thus turning off autorun feature just stops many malwares from spreading into a PC from a thumb drive.
SOME WELL KNOWN MALWARE:
Now you can now delete many worms manually some known viruses are Autorun.inf,iexplore.vbs,ifo.exe,raven.exe,rvhost.exe and NewFolder.exe(a worm looks like folder,but is actually an exe file,a worm).Better to use a nice antivirus and scan for viruses in the plugged in drive before opening it as these files will be hidden or access protected.But however you can view those files in command prompt by first entering into your removable drive(eg: J:)then type the following- attrib -h -r -s -a *.*.After typing that you can view those files.But it is better to use a nice Anti-virus software.
You can also many softwares available(like TrueCrypt) to password protect your pen drive .In such a case a window Pops Up every time when you plug in the drive.This would also help preventing the viruses from loading automatically into the pen drive. Using such softwares will also prevent unauthorized usage of data your drive, especially when your having sensitive information in your drive.
Saturday, March 1, 2008
MIRO ::::another universal player
MIRO although not a new media player around but of late it has evolved from being called as democracy player to miro.I would never say that it can act as a substitute to VLC player but the fact is---it plays almost all the video formats that that is there in media circle.Primarily it has been there as a web media player but now is available for various flavours of operating systems right form windows to mac to Linux.some of features which are worth mentioning are

BUT IT LACKS IN ADVANCE FUNCTIONALITIES AND PREFERENCES.
Rest i am sure you might discover it yourself.Worth a try.........
THE DOWNLOAD LINK IS->
- good skin interface.
- sound quality is somewhat better than other simple players.
- great in organizing & downloading online videos from youtube and its other clones.

BUT IT LACKS IN ADVANCE FUNCTIONALITIES AND PREFERENCES.
Rest i am sure you might discover it yourself.Worth a try.........
THE DOWNLOAD LINK IS->
Monday, February 25, 2008
Movie in MS Paint
MS Paint Trick goes here, I was not knowing that Painting area in MS paint utility works as Video screen!! lovely trick.
* First start a movie in any player.
* Then open Paint.
* Now, in the player when the movie is being played, press "Print screen" button on your key board.
* Now, Press ctrl+v in Paint
* Leave the movie player open and don't minimize it.
* Open Paint now and se the movie in the Paint!
* First start a movie in any player.
* Then open Paint.
* Now, in the player when the movie is being played, press "Print screen" button on your key board.
* Now, Press ctrl+v in Paint
* Leave the movie player open and don't minimize it.
* Open Paint now and se the movie in the Paint!
New status: get invisible on Google's Gmail Chat
There's a new feature in town for Gmail Chat, but it's actually not all that new. It's been possible for some time now to go into "invisible" mode via AIM and other chat protocols, but Gmail Chat is finally joining the invisible party.
Going invisible through chat software enables IMers to log into their IM accounts without showing that they've logged on. It's still possible for others to IM you, though it's unlikely since you wouldn't be listed as "online", and you can also IM others.
Invisible mode in Gmail Chat doesn't yet work with Google Talk, the gadget and desktop app. Currently, it's only supported via the online Gmail interface, but we're sure that'll change soon.
Saturday, February 9, 2008
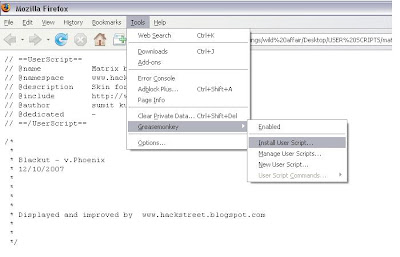
how to install user scripts in greasemonkey
Basically there are two ways in which you can install user scripts in greasemonkey.
first being :
go to the site hosting user scripts
and then press the button saying "install the script".
and then finally accepting it to install when a pop up screen
open up on the screen.
second way of doing it is:
download the user script on your system by using the option
"save link as" or simply downloading from the link.
All user script have an extension "filename.user.js"
So make sure you dont download any other scripts(eg php ).
now open the script in firefox and
go to TOOLS->GREASEMONKEY->INSTALL USER SCRIPT
and that is it you are all set to go!!!!!!!!!!!!!!!!
NOTE:I have added some scripts that i find userful on various sites
such as orkut, rapidshare etc in MY BOX(widget on right side of the page).
So you can straight away download them from here.....
first being :
go to the site hosting user scripts
and then press the button saying "install the script".
and then finally accepting it to install when a pop up screen
open up on the screen.
second way of doing it is:
download the user script on your system by using the option
"save link as" or simply downloading from the link.
All user script have an extension "filename.user.js"
So make sure you dont download any other scripts(eg php ).
now open the script in firefox and
go to TOOLS->GREASEMONKEY->INSTALL USER SCRIPT
and that is it you are all set to go!!!!!!!!!!!!!!!!

NOTE:I have added some scripts that i find userful on various sites
such as orkut, rapidshare etc in MY BOX(widget on right side of the page).
So you can straight away download them from here.....
Saturday, February 2, 2008
customize any webpage using GREASEMONKEY
Greasemonkey is a Firefox extension that allows you to write scripts that alter the web pages you visit. You can use it to make a web site more readable or more usable. You can fix rendering bugs that the site owner can't be bothered to fix themselves. You can alter pages so they work better with assistive technologies. You can even automatically retrieve data from other sites to make two sites more interconnected.
GREASEMONKEY DOWNLOAD LINK
SCRIPT REPOSITORY
WEBLOG OF GRESEMONKEY
USERSCRIPT
There is also online tutorials to write your scripts . There is an ebook (diveintogreasemonkey) that i have uploded in MY BOX(widget on right side of the page), which might be of intrest if you want to code your own scripts.
Greasemonkey by itself does none of these things. In fact, after you install it, you won't notice any change at all... until you start installing what are called “user scripts”. A user script is just a chunk of Javascript code, with some additional information that tells Greasemonkey where and when it should be run. Each user script can target a specific page, a specific site, or a group of sites. A user script can do anything you can do in Javascript. In fact, it can do even more than that, because Greasemonkey provides special functions that are only available to user scripts.
here are the links for every thing related to greasemokey:GREASEMONKEY DOWNLOAD LINK
SCRIPT REPOSITORY
WEBLOG OF GRESEMONKEY
USERSCRIPT
There is also online tutorials to write your scripts . There is an ebook (diveintogreasemonkey) that i have uploded in MY BOX(widget on right side of the page), which might be of intrest if you want to code your own scripts.
Sunday, January 27, 2008
BUSH bug in notepad
Well, I recently stumbled across a very weird code for Notepad. LOL, it seems Bush has hidden something in the Notepad. Now it’s up to us find what it is :
1. Open your Notepad
2. Type “Bush hid the facts” (without the quotes)
3. Save and close the window.
4. Open the file again and see.
Got anything? Well I got boxes instead of the words I just saved. What did you got? Will someone explain me what does this suppose to mean?
1. Open your Notepad
2. Type “Bush hid the facts” (without the quotes)
3. Save and close the window.
4. Open the file again and see.
Got anything? Well I got boxes instead of the words I just saved. What did you got? Will someone explain me what does this suppose to mean?
Saturday, January 26, 2008
synchronising your data between pc and usb drive
This utility called briefcase has been part of windows for quiet long.not many found it
useful since we started burning cd's and email forwarding option to get over it . but now
with the advent of pen drive it has become essential to find a tool which can syncronise your
data between your pc and your pen drive.and especially for all those friends of mine who keep
all those colourful things(pun intended!) in their pens..........here is how you can use briefcase
to syncronise your files and folders:
1.Open up My Computer or Windows Explorer, then click on the folder where you want to create the briefcase. Go to the main menu and select File -> New -> Briefcase
ORYou can also create a briefcase that lives on your desktop by right-clicking anywhere on the desktop, then selecting New -> Briefcase from the popup menu
2.you need to put the files that you want to keep synchronized into the briefcase.To copy files or folders to Briefcase,
you can drag the files or folders to the My Briefcase icon.
3.now move the briefcase to your pen drive.that is all you have to do.
Next time you make any changes in the documents that is part of the briefcase file,
all you need to do is just open the briefcase and click on update all or update one
on the main toolbar.now choose update option.
NOTE:After you copy files to Briefcase,
do not move the original files on the primary computer.
Briefcase keeps track of the original location of all the
files that you copy to Briefcase,but it is not able to
track the files if you move them to a different location.
Once you move a file on the primary computer,
the file is no longer associated with the copy of the
file in Briefcase, even if you move the file back to
its original location.If this problem occurs and
Briefcase is unable to synchronize the files,
you may be able to manually synchronize the files
instead.To do so, you must first decide if you want
to use the original file, or the copy of the file in Briefcase.
If you want to use the original file, you can synchronize
the files by deleting the copy of the file in Briefcase,
and then copying the original file to Briefcase.
If you want to use the copy of the file in Briefcase,
move the file from Briefcase to a new location on your
hard disk, and then copy the file to Briefcase.
Saturday, January 19, 2008
Five Firefox Tips You May Not Know About
The thing I like best about Firefox is that just when you think you know everything there is to know about the browser, something new comes along and surprises you.
I discovered five new Firefox tips today. Maybe these are old hat and you know them already. Or maybe like me, you had no idea these could be done.
1. Quick search - without going to a search engine first.
Are you reading a website and you subsequently discover a word or phrase that you want to put into a search engine? Up until now, I would just open a new tab, type in the URL for Google and manually type the word or phrase in. But it seems there is a faster easier way.
Just highlight the word or phrase with your mouse’s left-click button. Then drag the highlighted text into the address bar in the browser. Then press “enter”. Firefox will now perform a “Are you feeling lucky?” Google search for you.
2. Delete visited URL’s
When you drop down the box underneath the address bar, you can see your recent browsing history. But what if you want to remove one URL from that list? Maybe you’ve been looking at a naughty site and you don’t want your girfriend to know? Or maybe you’ve been shopping for your loved one online and you want to keep it a secret?
Just drop down the URL box, highlight the URL you want to zap then press the “delete” button on your keyboard. The URL will then be removed from the list.
3. Navigate to browser tabs using the keyboard
Instead of using the mouse to click on a tab, why not use the keyboard instead? Pressing CTRL + TAB together will bounce you from tab to tab, starting from the one in the far left and working its way along. Or if you want to go to a specifc tab straight away, you can do that too. CTRL + 2 will take you directly to the second tab from the left. CTRL + 5 will take you to the fifth tab from the left.
4. Start downloads instantly
Instead of right-clicking on a download link, choosing “save to target” and pressing enter, just drag the download link to the “downloads icon” in the toolbar. The download will start automatically.
5. Grab files off webpages, even protected webpages
Have you ever wanted a picture, file or video off a webpage but you can’t, because it’s been protected? Just right-click on the page, choose “View Page Info” then the “media” tab. Find the file you’re looking for from the list and click on “save”. (note : this doesn’t work for everything but I have still had a pretty high success rate nonetheless).
Friday, January 18, 2008
Inserting your name in task bar
Hey its a very cool trick; u can amaze u r friends by inserting your name on the bottom right task-bar. Follow the instructions bellow:
Open Control Panel -> Regional and Language Options -> Customize ->Timehere you can see A.M. and P.M. change it with u r name. Thats it.
Open Control Panel -> Regional and Language Options -> Customize ->Timehere you can see A.M. and P.M. change it with u r name. Thats it.
Friday, January 4, 2008
How to Estimate the Font File Size
in the previous post i discussed about embeding fonts .this way the size of word or power point documents increases . so there is one way besides other in which u can check the size of fonts that u wish to embed in your document
1. Click Start, point to Settings, and then click Control Panel.
2. Double-click the Fonts icon.
3. Right-click the font that you want, and then click Properties on the shortcut menu.
The size of the font on disk is listed in the Size row.
1. Click Start, point to Settings, and then click Control Panel.
2. Double-click the Fonts icon.
3. Right-click the font that you want, and then click Properties on the shortcut menu.
The size of the font on disk is listed in the Size row.
EMBEDING FONTS IN WORD OR POWER POINT DOCUMENTS
If u start using linux , then it becomes customary to abuse BILL GATES for every drawback or short-coming that we come across in WINDOWS or in MS OFFICE . One such draw back was maintaining fidelity in word document while using it on different systems.Luckily, the new Office 2007 provides an easy way to maintain the font styles used in a document (Word, PowerPoint, or Excel) even if the computer where you'll open it doesn't contain the fonts you used.
Here's how:
1. Click the Office Button (the round button on the upper-leftmost corner of the interface)
2. Select Word Options (or PowerPoint Options or Excel Options). A new window appears.
3. On the Save tab (on the left side), check the box with 'Embed fonts in the file'
4. Also check the box with 'Embed only the characters used in this document'
5. Click OK
6. Save your document and you're good to go.

Note You can embed only WAV formats in power point 2007 (WAV: A file format in which Windows stores sounds as waveforms. Such files have the extension .wav. Depending on various factors,one minute of sound can occupy as little as 644 kilobytes or as much as 27 megabytes of storage.) files in a presentation. All other sound formats will be linked, regardless of their file size. Also file size should be less than 50000 KB.
Subscribe to:
Comments (Atom)